


Table of contents
- What is React?
- Why use react.js?
- What is JSX?
- What is the virtual DOM? How does React use the virtual DOM to render the UI?
- Why was virtual DOM introduced?
- How does it work?
- React state and props.
- React Hooks
- What are the different lifecycle methods in React?
- What are the keys in React?
- React pure component
- React impure component
- State Management
- Error Handling
- Testing in React:
- Best Practices:
What is React?
React.js is an open-source JavaScript library, crafted with precision by Facebook, that aims to simplify the intricate process of building interactive user interfaces. Imagine a user interface built with React as a collection of components, each responsible for outputting a small, reusable piece of HTML code.
Imagine building web applications with lightning-fast, interactive user interfaces—well, that's the magic React brings to the table. It makes creating dynamic, single-page applications effortless, thanks to its reusable components and efficient rendering, resulting in the development of highly dynamic and responsive web applications, making it a great tool for crafting interactive websites.
Now, let's dive into why React.js has become the go-to choice for so many developers!
Why use react.js?
Reusable Components: React provides a component-based structure. Each tiny element like a button, checkbox, dropdown, etc can be a component and we create wrapper components composed of those smaller components. Each component decides how it should be rendered. Each component has its internal logic.
Fast-render with Virtual DOM: To display the view, react uses a virtual DOM. Virtual DOM represents the actual DOM in a virtual form. A new virtual DOM is generated every time the data changes in a react application. It's much faster to create a virtual DOM than it is to render the user interface in your browser. The efficiency of the app is therefore improved by using a virtual DOM.
SEO friendly: The React framework enables developers to create user interfaces that are easy to navigate through a variety of search engines. Additionally, it can render on the server side, enhancing the online visibility of an app.
Now Let's talk about JSX – the secret sauce of React.
What is JSX?
JSX stands for JavaScript XML. It makes your code more readable and lets you express UI components in a syntax that closely resembles HTML which is written inside JavaScript and placed it in the DOM without using functions like appendChild( ) or createElement( ).
- Without using JSX, we would have to create an element by the following process:
const text = React.createElement('p', {}, 'This is a text');
const container = React.createElement('div','{}',text );
ReactDOM.render(container,document.getElementById('app'));
- Using JSX, the above code can be simplified:
const container = (

 <div>
   <p>This is a text</p>
 </div>
);
ReactDOM.render(container,document.getElementById('app'));
As one can see in the code above, we are directly using HTML inside JavaScript*
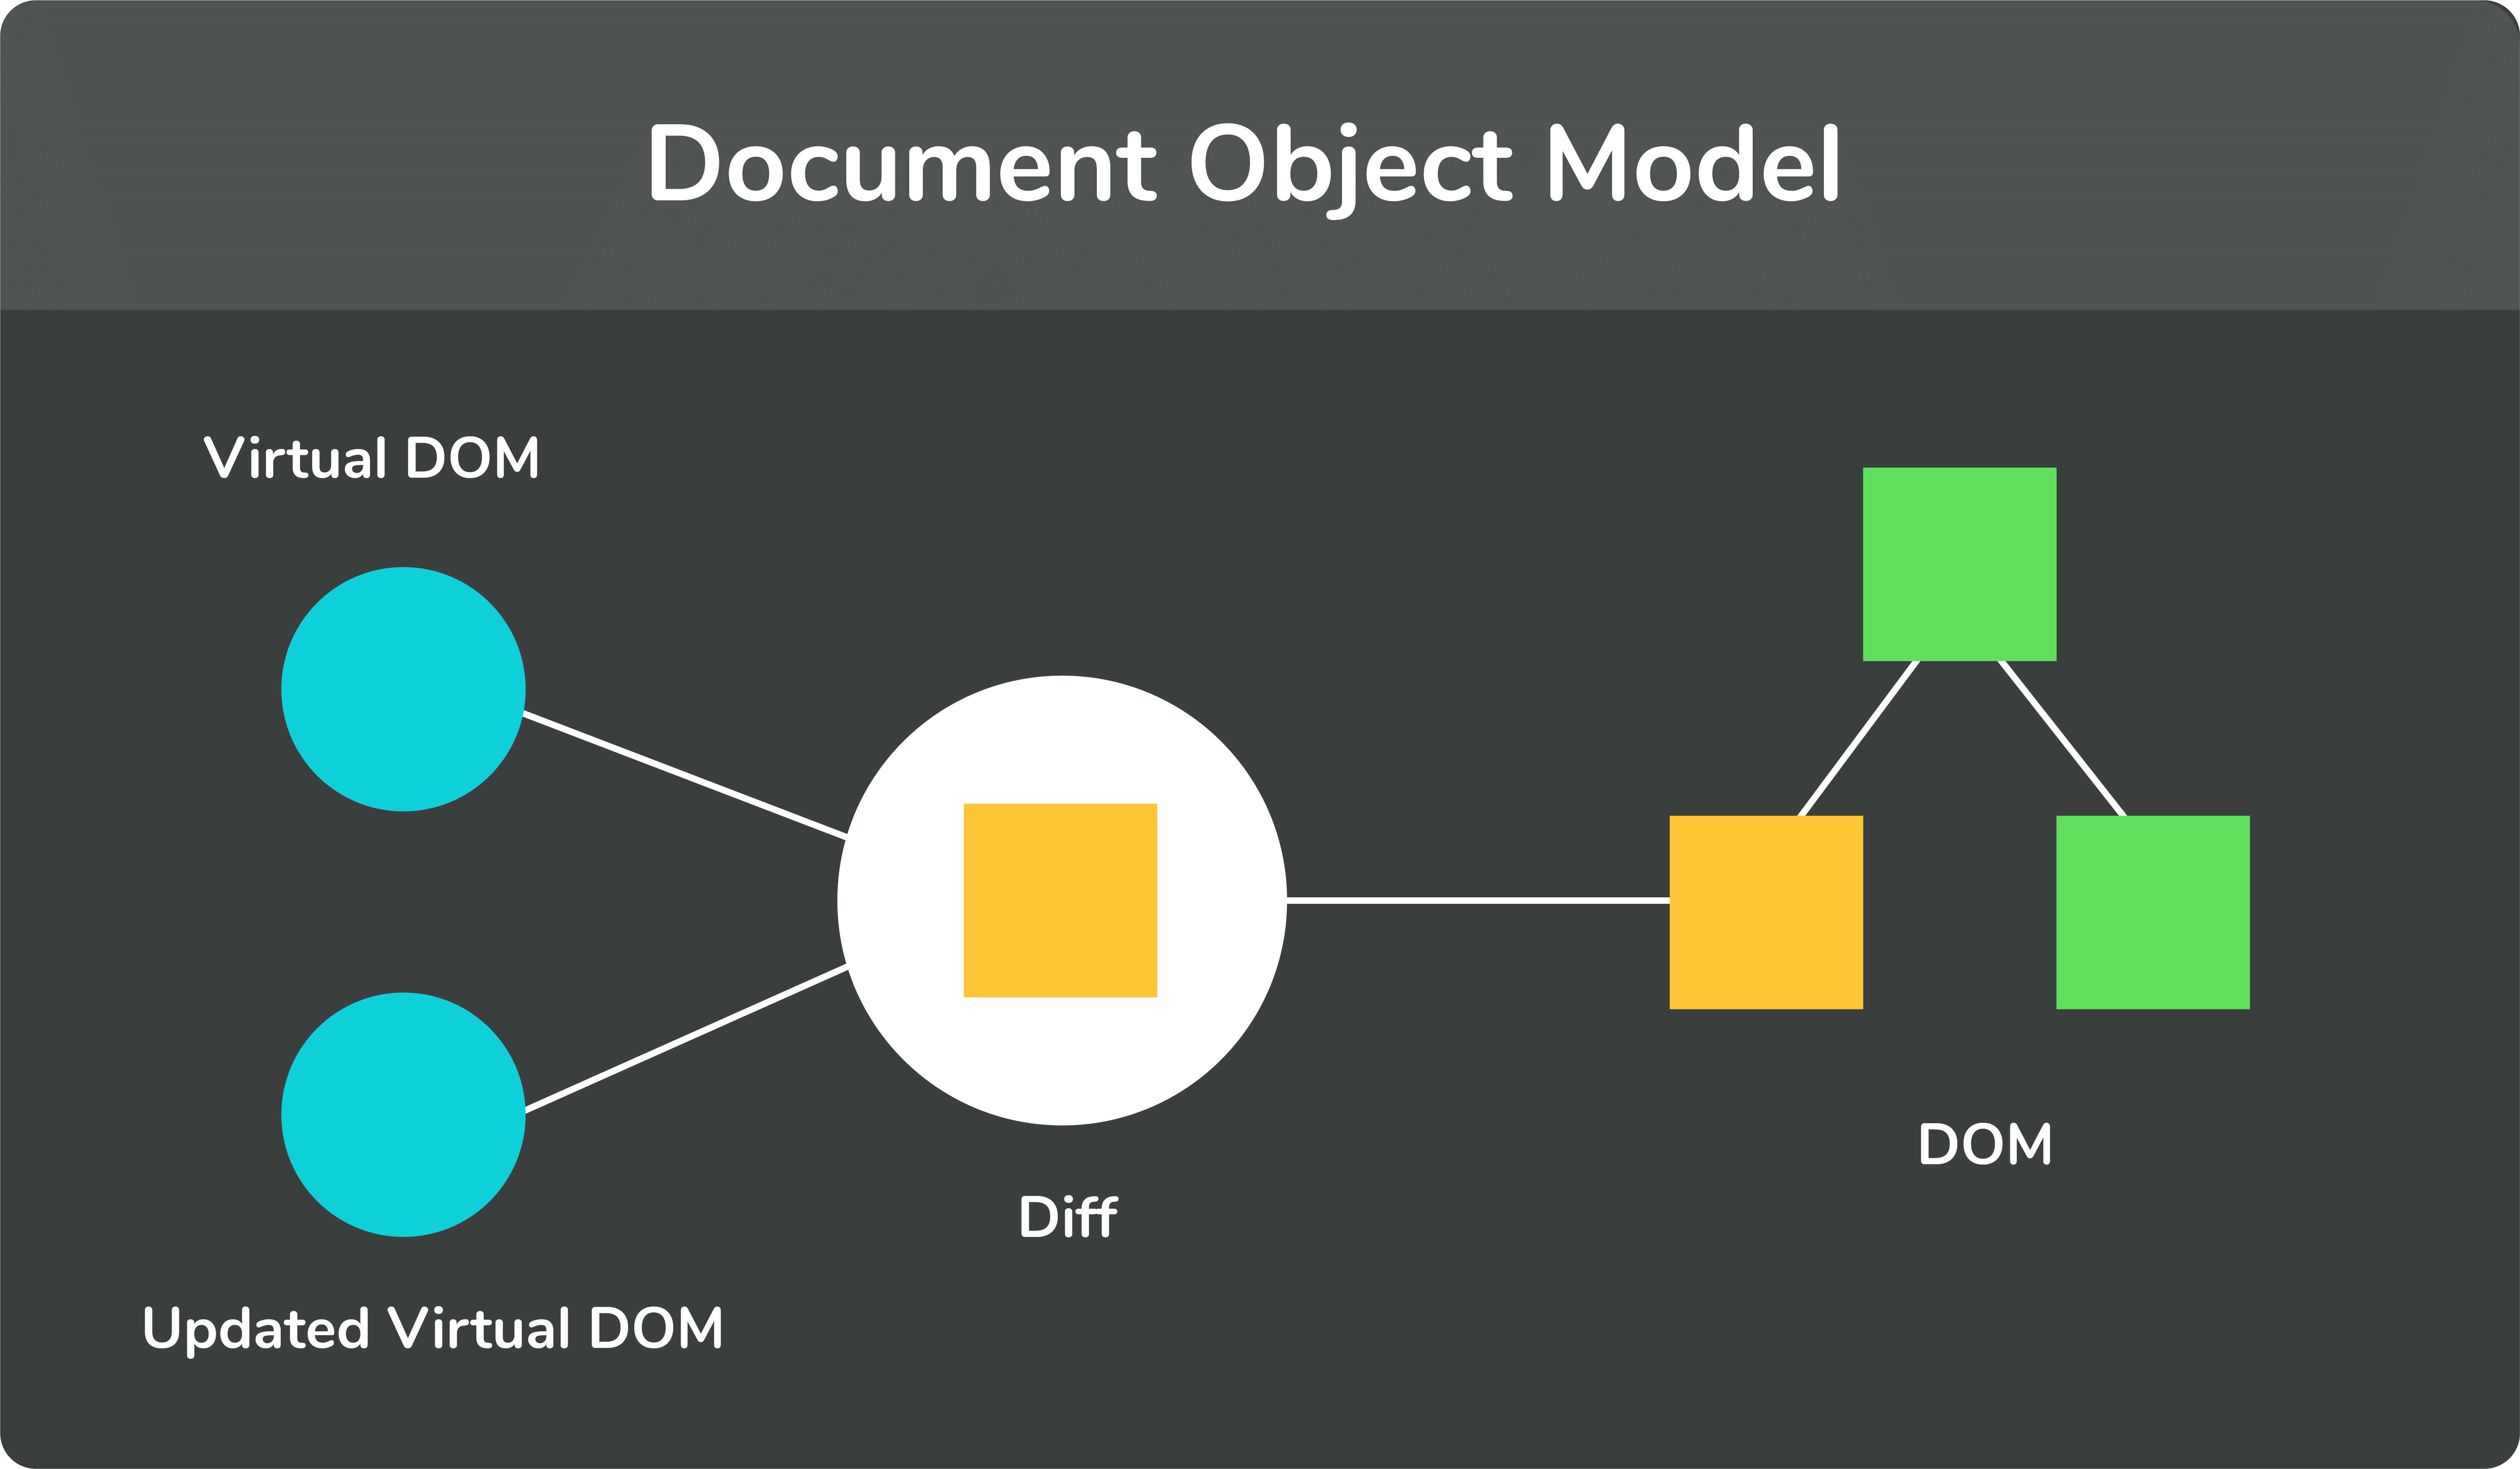
What is the virtual DOM? How does React use the virtual DOM to render the UI?
DOM stands for 'Document Object Model'. In simple terms, it is a structured representation of the HTML elements that are present in a webpage or web app. DOM represents the entire UI of your application
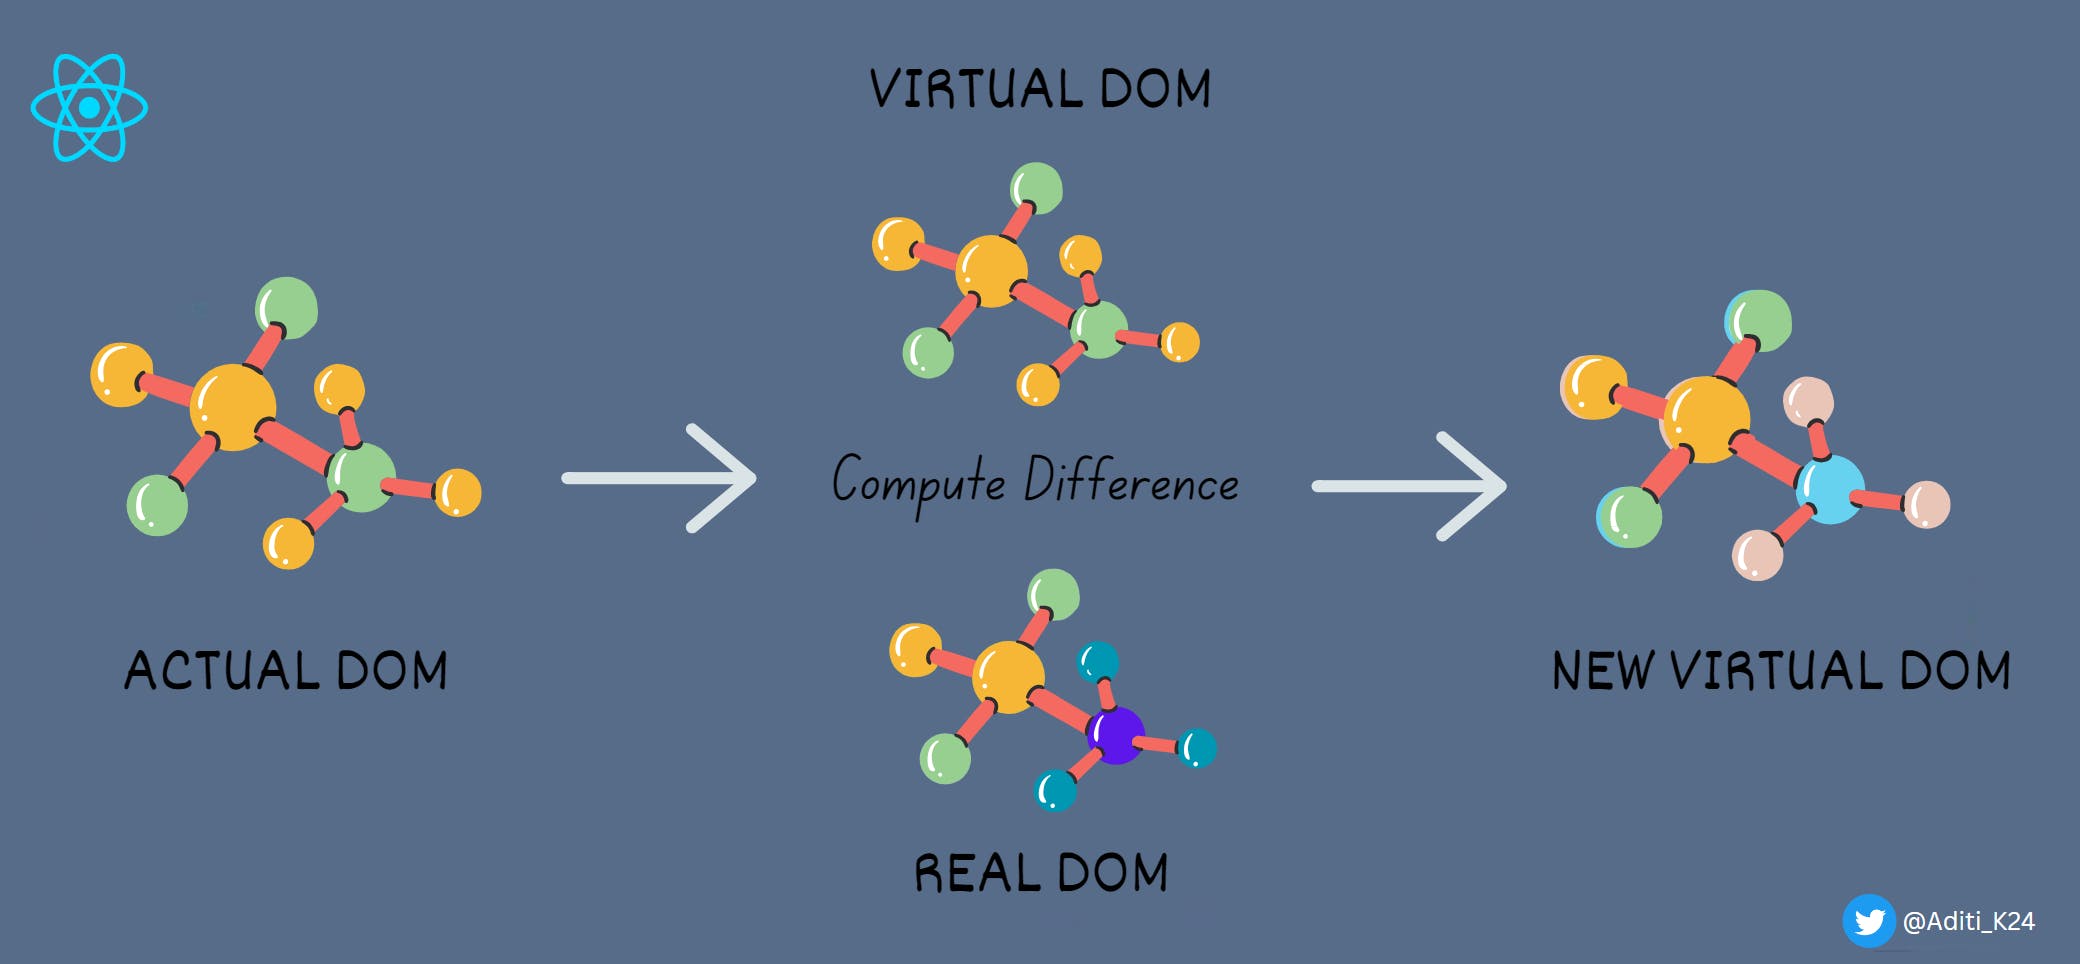
Virtual DOM is a concept where a virtual representation of the real DOM is kept inside the memory and is synced with the real DOM by a library such as ReactDOM.
Why was virtual DOM introduced?
DOM manipulation is an integral part of any web application, but DOM manipulation is quite slow when compared to other operations in JavaScript.
For example, consider a list that is being rendered inside the DOM. If one of the items in the list changes, the entire list gets rendered again instead of just rendering the item that was changed/updated. This is called inefficient updating. To address the problem of inefficient updating, the react team introduced the concept of virtual DOM.
How does it work?
For every DOM object, there is a corresponding virtual DOM object(copy), which has the same properties.
The main difference between the real DOM object and the virtual DOM object is that any changes in the virtual DOM object will not reflect on the screen directly.
Imagine you're playing with toy blocks, arranging and rearranging them to create different structures. The actual blocks (real DOM) represent what you physically see and touch. Now, picture having a sketchbook (virtual DOM) where you plan and draw the changes you want to make to your block structures before applying them.
Let's compare, the sketchbook is like the virtual DOM, a behind-the-scenes plan of your changes. When you decide to modify your block tower (update the UI), you make those changes first in the sketchbook (virtual DOM) instead of directly on the physical blocks (real DOM). Once you're satisfied with your plan, you implement those specific changes on the actual blocks.
Likewise, React uses a similar concept. It maintains a virtual representation of the DOM, comparing before and after states to efficiently update only what's necessary. This way, unnecessary efforts are minimized, making your app faster and more efficient.
React state and props.
A React component can access dynamic information in two ways using props and state. Let's explore them-
React State
Every component in react has a built-in state object, which contains all the property values that belong to that component.
In other words, the state object controls the behavior of a component. Any change in the property values of the state object leads to the re-rendering of the component.
Note- State object is not available in functional components but, we can use React Hooks to add state to a functional component.
How to declare a state object?
Example:
class Car extends React.Component{
 constructor(props){
   super(props);
   this.state = {
     brand: "BMW",
     color: "black"
   }
 }
}
How to use and update the state object?
class Car extends React.Component {
 constructor(props) {
   super(props);
   this.state = {
     brand: "BMW",
     color: "Black"
   };
 }

 changeColor() {
   this.setState(prevState => {
     return { color: "Red" };
   });
 }

 render() {
   return (
     <div>
       <button onClick={() => this.changeColor()}>Change Color</button>
       <p>{this.state.color}</p>
     </div>
   );
 }
}
As one can see in the code above, we can use the state by calling this.state.propertyName and we can change the state object property using the setState method.
React Props
Every react component accepts a single object argument called props (which stands for “properties”).
These props can be passed to a component using HTML attributes.
Using props, we can pass data from one component to another.
- While rendering a component, we can pass the props as an HTML attribute:
<Car brand="Mercedes"/>
The component receives the props:
- In Class component:
class Car extends React.Component {
 constructor(props) {
   super(props);
   this.state = {
     brand: this.props.brand,
     color: "Black"
   };
 }
}
- In Functional component:
function Car(props) {
  render() {
      return <h1>Name is {props.name}!</h1>;
   }
}
Note- Props are read-only. They cannot be manipulated or changed inside a component
React Hooks

Let's understand what is Hooks in React Js.
Hooks are functions that let you use state and other React features in functional components. React Hooks cannot be used in class components.
Why were Hooks introduced in React?
React hooks were introduced in the 16.8 version of React. Previously, functional components were called stateless components. Only class components were used for state management and lifecycle methods.
The need to change a functional component to a class component, whenever state management or lifecycle methods were to be used, led to the development of Hooks.
Example of a hook:
useState hook: In functional components, the useState hook lets us define the state of a component:
function Person(props) {
 // We are declaring a state variable called name.
 // setName is a function to update/change the value of name
 let [name, setName] = useState('');
}
What are the different lifecycle methods in React?
Visualize your React component's journey as a series of events – from creation to updates and eventual retirement. These events are the lifecycle methods.
Each component in react goes through three phases: Mounting, Updating, and Unmounting.
Mounting:- Birth of your component
Update:- Growth of your component
Unmount:- Death of your component
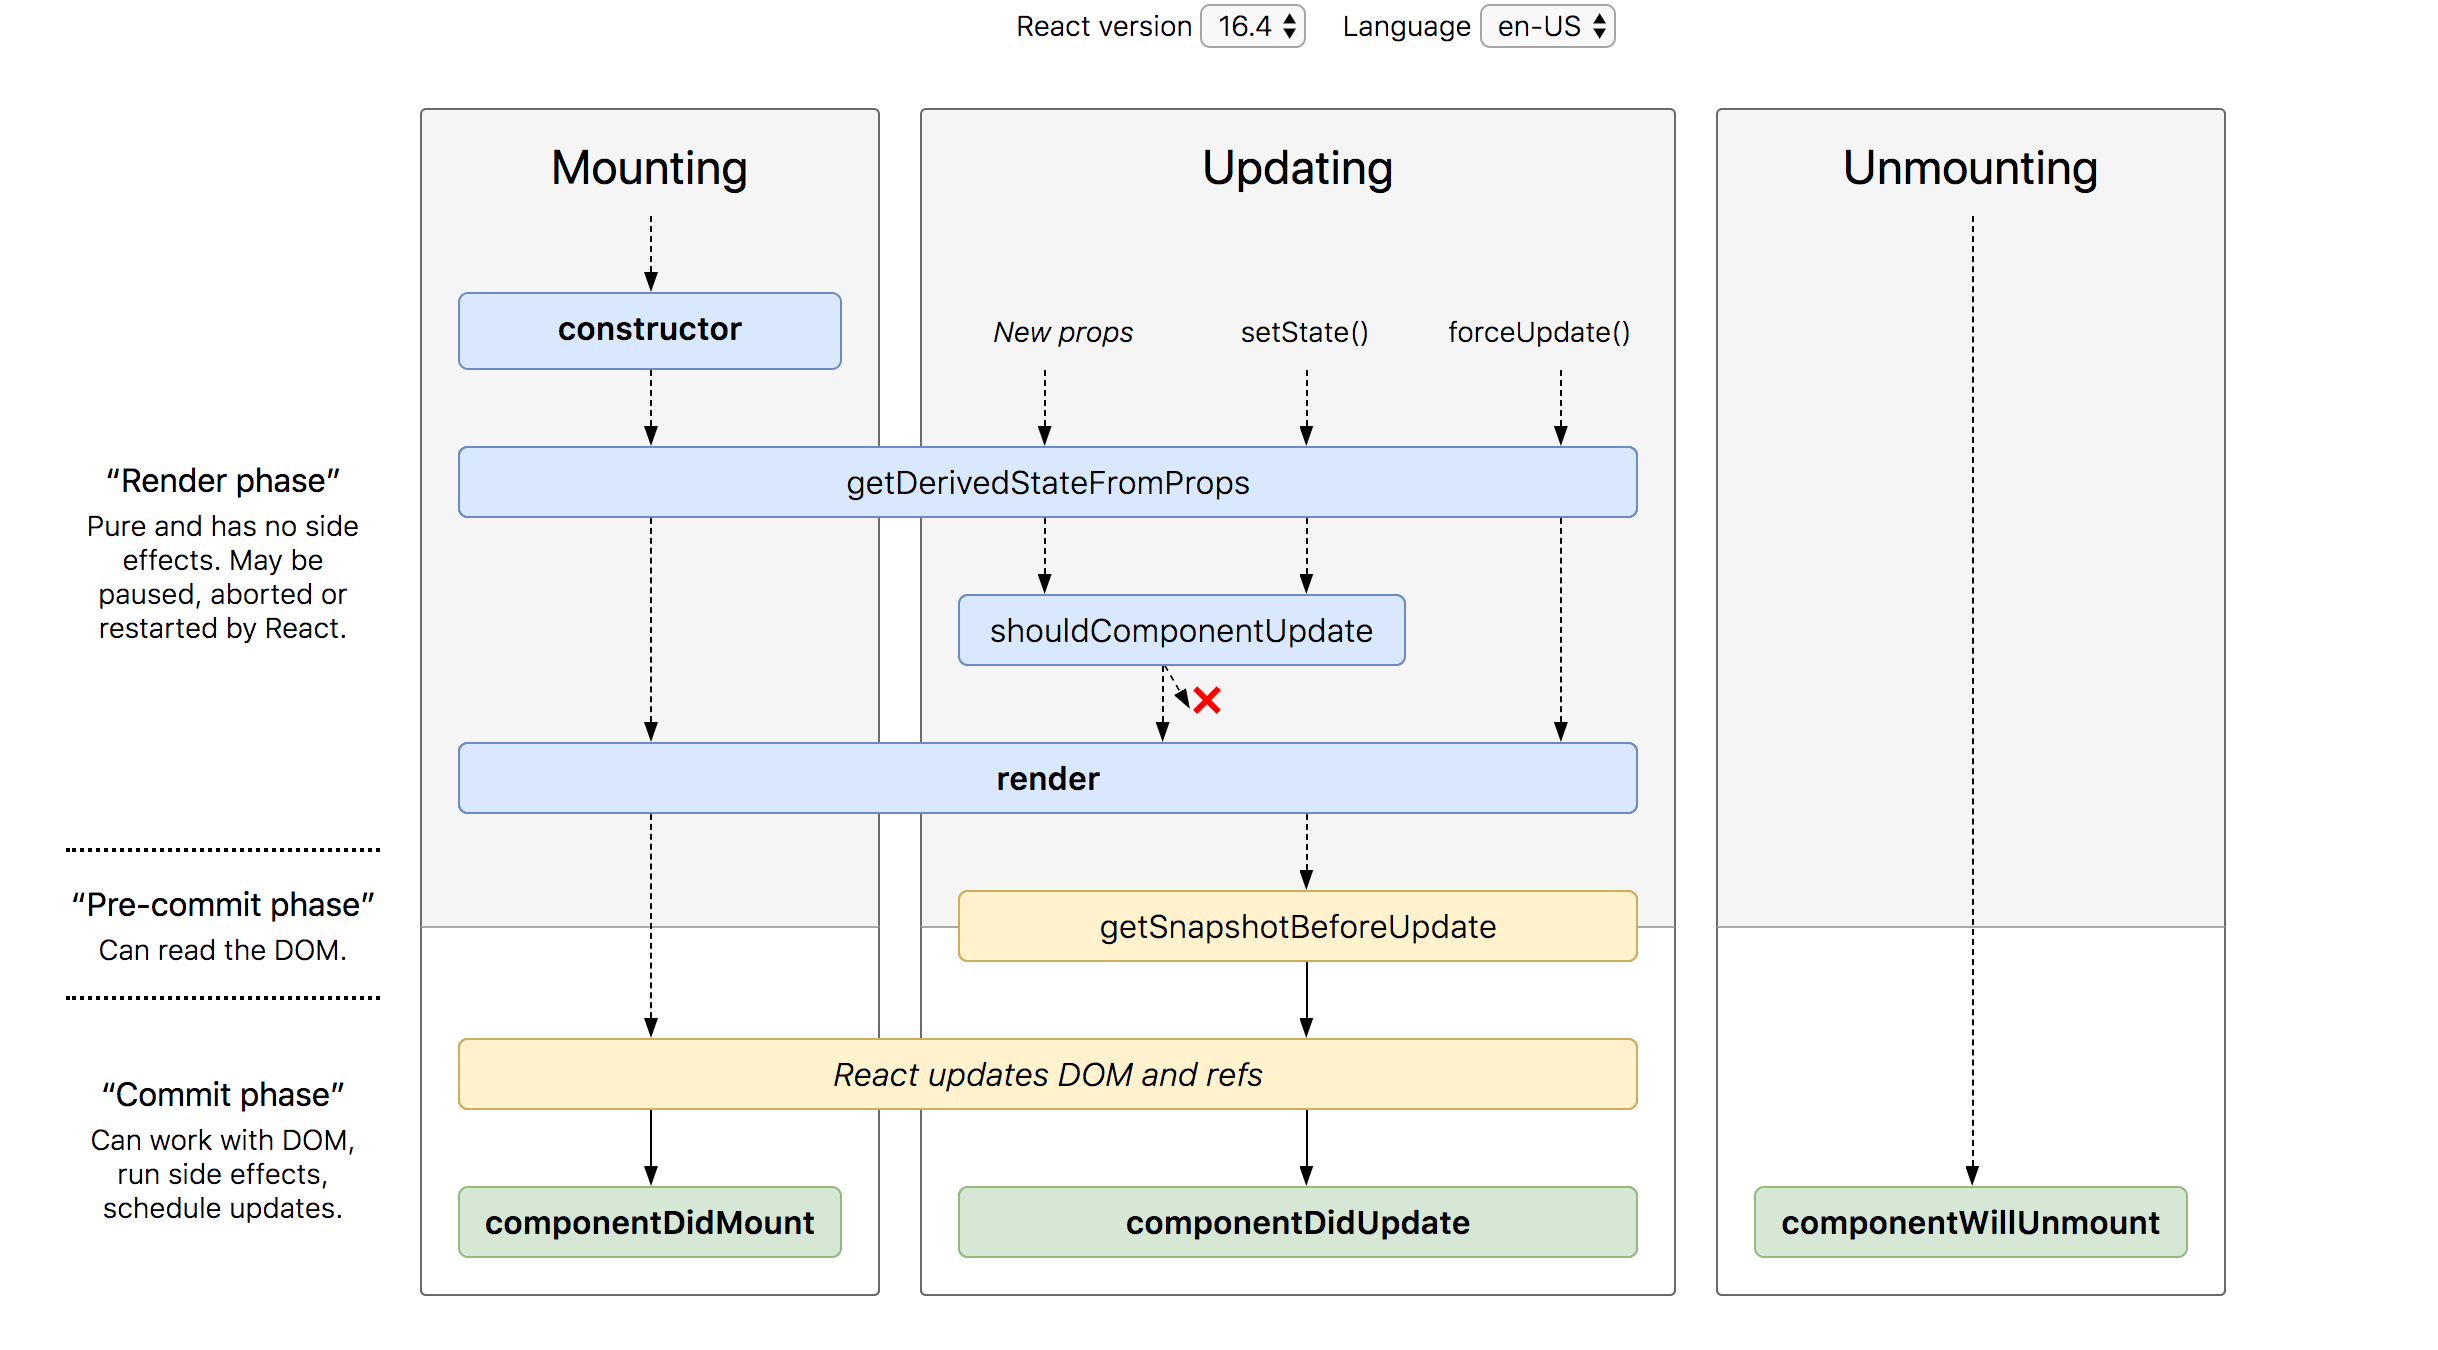
Common React Lifecycle Methods
- constructor()
This is used only if you have a class-based Component and it serves the purpose of initializing the state of a Component. In the case of functional Components, the useState() hook is used to do the same.
- render()
This is the method that is responsible for inserting a Component into the DOM.
The render() method is the most used lifecycle method. This is because render() is the only required method within a class component in React.
It happens during the mounting and updating of your component.
Below is an example of a simple render() in React.

class Hello extends Component{
   render(){
      return <div>Hello {this.props.name}</div>
   }
}
A render() can also return a null if there is nothing to render for that component.
- componentDidMount()
This is invoked after a Component is inserted into the DOM for the first time.
When a component has been mounted and ready, that’s when the next React lifecycle method componentDidMount() comes into play.
componentDidMount() is called as soon as the component is mounted and ready. This is a good place to initiate API calls if you need to load data from a remote endpoint.
componentDidMount() allows the use of setState().
- componentDidUpdate()
This is the method invoked after re-rendering an updated Component. This method can give you information about a Component’s previous state and previous props. This lifecycle method is invoked as soon as the updating happens. The most common use case for the componentDidUpdate() method is updating the DOM in response to prop or state changes.
You can call setState() in this lifecycle, but keep in mind that you will need to wrap it in a condition to check for state or prop changes from the previous state. Incorrect usage of setState() can lead to an infinite loop.
Take a look at the example below that shows a typical usage example of this lifecycle method.

componentDidUpdate(prevProps) {
if (this.props.userName !== prevProps.userName) {
this.fetchData(this.props.userName);
}
}
Notice in the above example that we are comparing the current props to the previous props. This is to check if there has been a change in props from what it currently is. In this case, there won’t be a need to make the API call if the props do not change.
- componentWillUnmount()
As the name suggests this lifecycle method is called just before the component is unmounted and destroyed.
You cannot modify the component state in componentWillUnmount lifecycle.
This is where you can perform any cleanups that need to be done such as invalidating timers, canceling network requests, removing event listeners, and so on.
componentWillUnmount() {
window.removeEventListener('resize', this.resizeListener)
}
What are the keys in React?
A key is a special string attribute that needs to be included when using lists of elements. They help React keep track of each component, making sure they are unique.
Example of a list using key:
const ids = [1,2,3,4,5];
const listElements = ids.map((id)=>{
return(
 <li key={id.toString()}>
   {id}
 </li>
 )
})
Importance of keys:-
The keys help you react to and identify which elements have been added, modified, or removed.
To provide a unique identity for each element, keys should be provided for array elements.
React does not understand the order or uniqueness of each element if no keys are available.
React pure component
A React component is considered pure if it renders the same output for the same state and props. Class components that extend the React.PureComponent class are treated as pure components.
As React uses the shouldComponentUpdate() method for a simple comparison of both props and state, pure components have some performance improvements and render optimization.
Features of React Pure Components
Prevents re-rendering of Component if props or state is the same
Takes care of “shouldComponentUpdate” implicitly
State and Props are Shallow Compared
Pure Components are more performant in certain cases
React Components re-renders in the following scenarios:
“setState” is called in Component
“props” values are updated
Re-rendering of the parent component, this.forceUpdate() is called.
Example:
function PureButton(props) {
  const { onClick, children } = props;

  return (
    <button onClick={onClick}>{children}</button>
  );
}
This is an example of a pure component, as it doesn't depend on any external state or other factors. It always returns the same output given the same input. It simply renders a button element with an onClick handler and the children passed to it as props.
React impure component
Impure functions are functions that can modify the state of the application or have side effects. In other words, they may return different outputs for the same input, depending on their current state or the state of the application. As a result, they can be more difficult to test and debug.
Features of React Pure Components
Functions can modify the state of the application or have side effects.
Functions depend on other parts of the code.
These are unpredictable, can have a non-deterministic behavior, and are harder to test, and maintain.
Example:
function getRandomNumber() {
return Math.floor(Math.random() * 10);
}

console.log(getRandomNumber());
console.log(getRandomNumber());
This is an example of an impure component, as, in this example, the getRandomNumber() function generates a random number between 0 and 9 each time it is called, which is a side effect.
State Management
State management is a crucial aspect of React development, ensuring efficient data handling and flow within an application. In React development, effectively handling and organizing data is important. The Context API in React is a useful tool that enables you to manage data much more easily, particularly when it is distributed across various parts of your project.
Imagine you have a big tree of components in your project, and passing data between them becomes a hassle. The Context API steps in to save the day! It creates a central hub for data, so any part of your project can easily access and use that data. This makes things way easier when you're working with shared information among different sections of your application.
How It Works:
Create a Context: Use
React.createContext()to create a new context.Wrap Components with Provider: Wrap the components that need access to the shared state with a
Context.Providercomponent.Accessing the Context: Utilize
useContextHook or theConsumercomponent to access the context within any child component.
Now that we've got the hang of React, there's a possibility we might encounter errors on the road. So, let's delve into learning about Error Handling.
Error Handling

Error boundaries are React components that catch JavaScript errors anywhere in their child component tree, log those errors, and display a fallback UI instead of the component tree that crashed. Error boundaries catch errors during rendering, in lifecycle methods, and constructors of the whole tree below them.
A class component becomes an error boundary if it defines either (or both) of the lifecycle methods static getDerivedStateFromError() or componentDidCatch(). Updating the state from these lifecycles lets you capture an unhandled JavaScript error in the below tree and display a fallback UI.
Now, let's talk about testing
Testing in React:
In React, testing ensures that your components do what they're supposed to do. Testing is an integral part of maintaining a healthy and reliable React codebase. It ensures that components and features work as expected and protects against any unexpected issues when you're making updates.
Testing Libraries includes:-
Jest: A delightful JavaScript testing framework with a focus on simplicity.
React Testing Library: A lightweight and beginner-friendly library for testing React components.
Types of Testing:
Unit Testing: Testing individual functions or components in isolation.
Integration Testing: Ensuring that different components work together as expected.
End-to-End Testing: Testing the entire application to simulate user interactions.
Best Practices:
Writing clean React code is important because it reflects a careful and dedicated mindset. When we take the time to write clean, well-organized code, we are demonstrating a commitment to software development and making it easier to work with and understandable.
Here are some Key Best Practices you can follow to write clean React code:
Component Structure: Keep components small, focused, and single-purpose.
State Management: Use local state as much as possible; use state management libraries for complex global states.
Use of Functional Components and Hooks: Embrace functional components and hooks for cleaner and more concise code.Immutable Data: Avoid direct state mutations; use immutability for better predictability.
Consistent Code Formatting: Enforce consistent code formatting using tools like ESLint and Prettier.
By incorporating these best practices, developers can create React applications that are not only robust and efficient but also easy to maintain and extend over time.
Conclusion:
From component basics to the magic of the virtual DOM, React empowers you to build cleaner, more efficient UIs. React is about reusable components, speedy updates, and dynamic interfaces. Whether dealing with components, managing state, or testing, React equips you for success. So, go ahead, code, explore, and embrace the React mindset. Keep learning, keep coding,